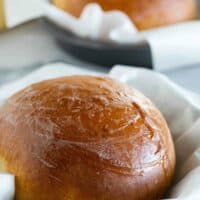
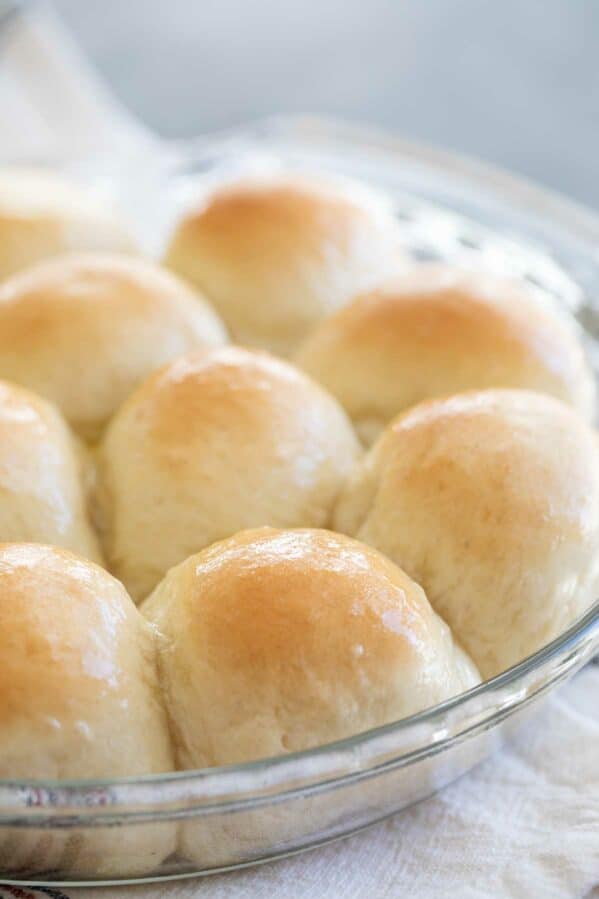
Soft and slightly sweet, this Hawaiian Bread is the perfect side dish to any Hawaiian meal. Serve it up as a side with butter, and save a loaf for French toast the next day!
If you can’t make it to Hawaii, bring the flavors of Hawaii to you with this Hawaiian Bread alongside some Huli Huli Chicken and Hawaiian Macaroni Salad.

I have always said that no matter what my death bed meal consists of, there will for sure be bread. And now I’m thinking there will be a whole loaf of this Hawaiian Bread there that I get all to myself.
It really is that good.
When I recently made this bread, I made two batches in two days. Which gave me 6 loaves of bread. I was desperately trying to give it away because I had absolutely no self-control around it and knew I would eat it all myself if it was in front of me. (And I heard that it disappeared quickly for those who I gave it to, so I wasn’t the only fan!)
This Hawaiian Bread is slightly sweet with a soft, velvety texture. It’s similar to brioche (because of the eggs and butter) and has the perfect amount of sweetness. Not too overpowering – it didn’t taste like dessert – but sweet enough for you to know that it is something special.

Ingredients
Full amounts and instructions are located in the recipe card at the end of the post.
- Water: You want warm water – around 110ºF. If you don’t have a thermometer, that’s ok. It should be warm to the touch, not hot enough to have to pull your hand away.
- Yeast: This recipe calls for active dry yeast.
- Butter: You’ll want unsalted butter.
- Pineapple Juice: Your bread won’t taste like pineapple, but part of its sweetness comes from the pineapple juice. Use 100% juice not from concentrate if possible for the best flavor, but juice from concentrate will also work if that is what you have.
- Milk: I use 2% because that is what I keep on hand, but whole milk would be even better.
- Bread Flour: I love using bread flour for this recipe, but if you don’t have it, all purpose flour could be substituted.
- Instant Mashed Potato Flakes: I love a good potato bread, and by using potato flakes, you get a lot of the same benefits. You get a lovely soft texture and a moist bread – largely due to the potato flakes.
- Sugar: This is a sweet bread, so I wouldn’t cut back on the amount of sugar.
- Salt: I like to use sea salt or kosher salt.
- Eggs: You’ll want room temperature large eggs.
- Vanilla: This brings in some of the sweet. It’s not an overwhelming flavor, but adds just the right amount of vanilla in the background.

How to Make Hawaiian Bread
1 – Combine the yeast and the water and let them sit until it starts to foam.
2 – Melt the butter, then add the pineapple juice and milk and heat until it’s about 110ºF.
3 – Mix together 4 cups of the flour, the potato flakes, the sugar, and the salt.
4 – Add the butter mixture.
5 – Then add in the yeast mixture.
6 – Add the eggs and beat to combine.
7 – Mix in the vanilla extract.
8 – Start adding in the remaining flour 1/2 cup at a time. Add until the dough starts to pull away from the sides of the bowl, then switch to the dough hook and knead the dough for 5-6 minutes. The dough should be smooth, and still tacky but not sticky.

9 – Transfer the dough to a bowl that has been sprayed with nonstick cooking spray. Cover and let it rise.
10 – Let it rise until it has doubled.
11 – Turn the dough out and divide it into 3 equal pieces.
12 – Shape the dough and place it in a parchment lined pan. See below for more information about shaping the bread.
13 – Cover the dough again and let it rise until doubled a second time.
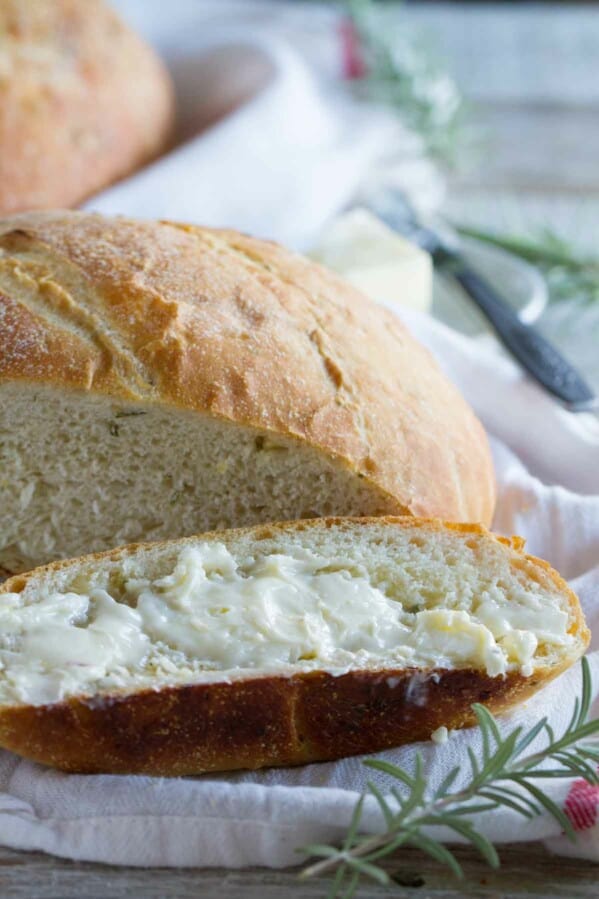
14 – Bake the bread until golden brown. Remove from the oven and spread butter over the top of the hot loaf. Be careful to not burn your fingers!

Shaping Hawaiian Bread
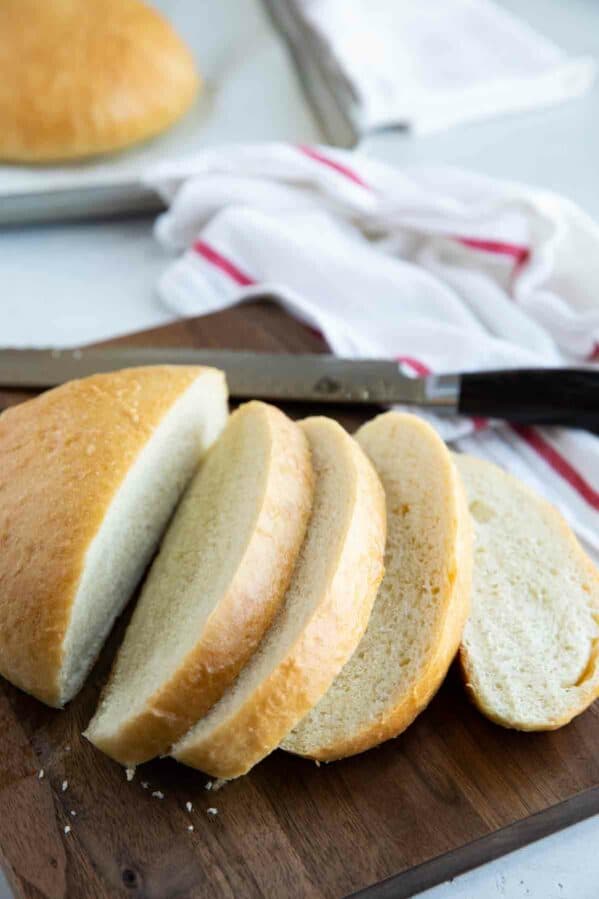
A lot of times, you’ll see Hawaiian bread shaped into boules, or round loaves. I also like to bake it in a traditional loaf, as well. (This bread makes amazing French toast, so a loaf is perfect for slicing.) The good thing is that this recipe makes 3 loaves, so you can mix and match!
For a Round Loaf
Place your dough on a lightly floured surface. Flatten it slightly (to de-gas) into a circle. Take one edge and fold it into the middle. Holding that piece in the middle, work your way around until you have all the ragged edges in the middle. Turn the dough over so that the ragged side is on the bottom. The top should be smooth. Place this in a 9-inch pan (I use a cake pan) that is lined with parchment paper. I don’t cut the parchment to fit – I just place the piece in the pan and place the loaf on top.
For a Traditional Loaf
The easiest way to make a loaf is to take your dough on a lightly floured surface and roll it into a rectangle about 11 inches by 8 inches. Roll the dough up tightly on the long side. Once it is rolled, pinch the edge into the bread to seal. Now take the edges and fold them over slightly, pinching again to seal. This will help so that the bread does not come open while baking. Do this on both sides so that the loaf is the same length as your loaf pan. Transfer the loaf to a loaf pan that is greased or lined with parchment.

How to Know if Your Bread is Done
This is often the hardest part of the recipe!
And it doesn’t help that this bread gets nice and brown during baking because of the amount of sugar. So you may be tempted to pull it out of the oven when it is lightly golden.
But no one wants a gooey center to their bread.
The easiest way to know if your bread is done baking is to test it with an instant read thermometer. The interior temperature should be 200ºF. If you don’t have a thermometer, use a wooden spoon to tap on top of the loaf. If it sounds hollow, it should be done.
If your bread is getting darker than you’d like, lightly cover it with foil during the last 10 minutes of baking.

Storing
This bread can be stored at room temperature in a bread bag or in an airtight container for 3-4 days. If you want it to last longer, you can put it in the refrigerator, but the refrigerator tends to suck the moisture from bread.
You can also freeze the baked loaves. Since this does make 3 loaves, it is a good way to not inhale all three right after making them. Let the bread cool completely then wrap tightly in foil or plastic wrap. Then I will put it in a freezer safe ziplock or another freezer safe container. Freeze for up to 6 months. Let it thaw overnight at room temperature, but leave it covered until it is thawed.

Love Baking Bread? Try These Bread Recipes:
White Bread Recipe
Brioche Bread
Artisan Bread Recipe
Dinner Rolls Recipe
French Bread Recipe
Focaccia Bread Recipe
LOOKING FOR MORE FREE RECIPES?
Subscribe to my free recipe newsletter to get new family friendly recipes in your inbox each week! Find me sharing more family-friendly inspiration on Pinterest, Facebook, and Instagram.
Hawaiian Bread
Ingredients
- 1/2 cup (114 g) warm water
- 4 1/2 teaspoons (1/2 oz) active dry yeast
- 1/2 cup (113 g) unsalted butter, softened
- 1 cup (8 oz) pineapple juice
- 1 cup (8 oz) milk
- 7 1/2 to 8 cups (900 g – 960 g) bread flour
- 3/4 cup (50 g) instant mashed potato flakes
- 2/3 cup (150 g) sugar
- 1 teaspoon salt
- 3 eggs
- 2 teaspoons vanilla extract
- 1 tablespoon unsalted butter
Instructions
- In a small bowl, combine the water and yeast. Let it sit until the yeast foams, about 5 minutes.
- Meanwhile, melt the butter in a small pot. Add the pineapple juice and milk and heat until it reaches 110ºF. (If it gets hotter than that, set it aside until it has cooled to 110ºF – 115ºF so that you don’t risk killing the yeast.)
- In a large bowl, or the bowl of a stand mixer, combine 4 cups of the flour, the potato flakes, sugar, and salt.
- Add the butter mixture to the bowl, followed by the yeast mixture. Mix to combine.
- Add the eggs, mix, then add the vanilla. Start adding the remaining flour, 1/2 cup at a time, until it starts to come together. Switch to the dough hook and continue to knead for about 5-6 minutes, adding flour as needed, until the dough is soft and smooth – it will still be tacky, but shouldn’t be overly sticky. (Alternately, turn the dough out onto a surface and knead, adding flour as needed, until smooth and soft.)
- Spray a large bowl with nonstick cooking spray. Add the dough, and turn once to coat. Cover and let rise until the dough has doubled, about 1 1/2 hours.
- Once the dough has risen, punch it down and turn it out onto a lightly floured surface. Divide the dough into 3 equal portions. If making round boules, shape into balls and place in 9-inch pans that have been lined in parchment paper. If making loaves, shape and place in 9×5-inch loaf pans. Cover and let rise again until doubled, about 45 minutes.
- Preheat the oven to 350ºF. Bake the loaves until golden brown, about 30-35 minutes. If the bread starts to become too dark, cover lightly with foil in the last 10-15 minutes.
- If desired, rub the loaves with butter as soon as they come out of the oven. Let cool before slicing.


Holly says
can i add raisins to this recipie?
Deborah says
I haven’t tried, so I can’t say for sure, but I would think that you could!
Steve Craddock says
I just tried this recipe today, and the bread turned out beautifully! One round loaf was nearly devoured after it cooled. I imagine our kids and grandkids will finish off the ther two in just a couple or three days. Thank you for this recipe. I will definitely make it many more times!
Rebecca Layne says
This bread is a big hit with my grandchildren.
Deborah says
I’m so glad they loved it!
Jennifer Shade says
This recipe worked fabulously. I made two 5×11 long loaves of bread with it. Next time I’m going to try it without the potato flakes. It came out pretty dense. I would like it to be just a little lighter. It was so delicious.
Patricia says
This is so good! I can’t make it very often, because I just wanna eat it all myself. I dropped a loaf off at my neighbors house, and she called later raving about how good it was. Thanks for the recipe!
Deborah says
I’m so glad both you and your neighbor enjoyed it, Patricia!
Steve C. says
I made this recipe today and it is the softest, most delicious bread I’ve made! This recipe is a keeper! Thank you!
Steve
Deborah says
I’m so glad you loved it! Thanks for the review, Steve!
Mary Smith says
My godson loves a giant veggie burger using Hawaiian bread as the bun. The loaf has become impossible to get so I want to make it. It needs to be big- the original loaf bursts outside the pan edge- so should I just divide this in 2?
Deborah says
Hi Mary, you can try making it into 2 loaves, but they may be too big for a loaf pan. The 3 loaves won’t be bursting over the pan edge, though. It may just take some experimenting.
Yvette says
Great recipe! I did a few minor modifications to what I had on hand. Delicious. Just had been in Kona at the bakery, this proved a close second. I used orange peel(I have a tree) & coconut milk(no evaporated in pantry). Family loved it!
Evette Peterson says
Wow loved it
Ellen W says
I love Hawaiian Sweet Bread– Can this be made in an Air Fryer? If so, how would I have to adapt this receipe?
Thanks,
Deborah says
I’m afraid I have never made bread in an air fryer, so I don’t have an answer for you. Sorry!
Nicole Colonna says
This was my first time making bread and it came out great! I struggled shaping the dough as its extremely sticky and difficult to knead just using my hands, but luckily I had a stand mixer to work with! Great, sweet bread that reminds me of King’s Hawaiian rolls! Thanks for the recipe!
Ruth Miller says
I am trying this today I will let you know how the congregation likes it since it will be served for communion.
Meemee says
Deborah do you think this will work with apf. Bread flour is hard to find in my country. I really love your site.
Deborah says
Hi Meemee – I’m sure all-purpose flour would work just fine. 🙂
Ellie says
Should I warm up the milk first before I mix in the yeast or can I used cold milk straight from the fridge?
Deborah says
Yep, the milk is warmed.
Maria Furna says
Just like the malassadas, sorry left that out😊
Maria Furna says
Its not a Hawaiin recipe its a Portuguese sweet bread recipe bought there by the Portuguese that settled there just like the , not sure why but before when you bought the rolls it would say Portuguese sweet bread. Just saying 😉
Rockey says
It’s not the same…portuguese sweet bread doesn’t use pineapple juice…it is called Hawaiian bread because of the pineapple juice used…
Manal says
What fo u mean by pakages of dry yeast??? Thanks
Deborah says
I have updated the recipe and listed the amount in teaspoons.
Yvette Green says
I have a bread machine and would use it on the doaugh setting to make the dough. Do you think the same amount of yeast is needed? Should I use the sameyeast or bread machine yeast?
Deborah says
@Yvette Green, I wish I could help you with that – I don’t use a bread machine, so I don’t know the answer.
Jonn Norman says
Deborah ~ Looks like it has been quite a long time, since anyone has posted here. Today, I will be preparing your Hawaiian Sweet Bread. I chose your recipe because, I like the lemons that is used in this particular recipe. I see that you did not use any potato flour, as the other recipes I have prepared, uses this ingredient. I so appreciate your publishing this recipe. If it turns out as good as your blog states, I will keep this and prepare this bread each time I begin to crave the sweet savourings of Hawaiian Sweet Bread. Thank you so very much. I live in Salt Lake City, but was born in Honolulu, Hawaii. Once again “Mahalo Nuil Loa.”
Deborah says
@Jonn Norman, it has been so long since I have made that recipe – please do come back and tell me how it turns out for you! Maybe I’ll have to make up a loaf today as well!
Jen says
How long would you guess it took for each rise? Trying to plan out how much time I need to set aside to make this!
Happy Cook says
When i was skyping with my sis inUS she was saying about this bread and I mentioned to her I saw in your place howto make them, I am gonna try this but then in rolls. Looks really yumm.
cmjhawaii says
Thank you for the recipe. I live in Hawaii, grew up in Hawaii and love sweet bread. I'll definitely have to try this. We love to toast it and slather some butter on it.
I'll have to try this out and see how it compares.
grace says
i had a stint as a child where i decided i didn't like bread. a slice of hawaiian sweet bread put me on the road to recovery, and i'm not kidding–good stuff!
Emily says
Yum! I love Hawaiian bread. I could definitely make a meal out of it. 🙂
scrambledhenfruit says
I LOVE those Hawaiian rolls! Thanks for the recipe. 🙂
Tasha says
Hawaiian bread is so good, but I can't remember the last time I had any. I'm definitely in the carb-loving camp and this looks wonderful.
Pam says
Your bread looks very tasty! I love to bake bread and have to try this one. Love Hawaiian bread.
Karly says
Oh, I adore those King's Hawaiian Rolls. I'm going to have to try this!
Monet says
Growing up…my mom would sometimes pick up a roasted chicken and a package of Hawaiian sweet rolls from the store. So good! Your bread looks great. Thank you for sharing. Here's to a wonderful weekend!
Joanne says
I adore those Hawaiian sweet rolls and this bread sounds fabulous! I will definitely be giving this a try.
teresa says
my baking hubby would love to try this. i've heard of hawaiin bread, but i've never tried it, it sounds delish!
Michelle says
You know, I haven't baked much bread. I probably would have been lost if the directions weren't super specific!